Mar 29, 2012

Vazhakka Pulissery/Moru Curry(Raw plantain in Yogurt gravy)

Growing up, there were only a few handful dishes I knew to make...and I were only good at those ones...unlike my sis, who was ready to take risks and tried (and always succeeded) new recipes and dishes...jotting down recipes from every cookery shows we watched together...this pulissery is something I were good at making.....time after time...something I used to be very proud of in those days :)


This curry is something we make in our place at least once a week...like daal curry...very simple one, if you have enough yogurt and coconut handy, which is always found in our fridge....has got good shelf life too

You'll need:

Raw plantain: 2 no:s (peeled and diced into small pieces)
Yogurt: 1 cup
Turmeric powder: 1/2 tsp

For grinding:

Green chilli: 2-3 nos
Jeera: 1/2 tsp
Grated coconut: 1/2 cup

For tempering:
Oil: 2tsps
Mustard seed: 1/2 tsp
Dry red chili: 2-3 nos
Asafetida: a pinch
Curry leaves: a few sprigs


How to make:
Cook the plantain pieces with turmeric powder, salt and 1/2 cup water in a pressure cooker.
Grind the ingredients mentioned above into a very fine paste, adding just enough water.
Now this is a very important tip to prevent the pulissery from curdling...Cook the ground paste on low flame for about 3-4 min, stirring it in between. Now add the cooked plantain pieces to it.
Beat the yogurt well with a spoon or give it a stir in the blender for a min to make it thin.
Add the beaten curd to the already cooking mixture and let it boil on medium-low flame.
For tempering, add 2 tsps of oil in a pan and let the mustard seeds splutter.
Add red chillies, curry leaves and at last add a pinch of asafetida.
Yummy pulissery is ready...a sour curry to go with rice and subzi(vegetable)


Note: You can use any kind of vegetable you like instead of raw plantain. Winter melon is the best alternative if you are planning to keep this for a couple of days in the fridge.Plantain gets hard on day two, where as winter melon stays soft. Can use cucumber too...

There is another sweet n sour version of this called Mampazha pulissery which uses ripe mangoes...which is the ultimate pulisseri on earth...that too the one my grandma makes with the farm fresh mangoes from her backyard....finger licking good :)

Mar 22, 2012

Lemony steamed corn/Masala butter corn

Masala butter corrn....that is what we call it back home in India...remember the butter corn you get in those little stalls outside the shopping malls...where you  pay a fortune for a small paper cup of  steamed corn ..i mean it used to be 25 bucks for a cup long time ago.....i'm sure it would have gone up by now...but still its worth it, when you are all in the mood to laze around in a mall,on a weekend.... mostly window shopping or checking out new trends...ending up buying something silly and cheap :)
gone are those days...oh! my..it used to be so much fun...nothing to worry about....carefree spinsterhood days....these steamed corn always takes me back to those good days in Bangalore...very easy snack...can be used as a side too...or as a salad for the healthy eaters out there.
You'll need:
Corn: 1 can, washed and drained ( instead you can use a packet of frozen corn or fresh corn too)
Butter: 1 tbsp
Italian seasoning-2 tsp (Or use chat masala powder)
Lemon juice: 1-2 tbsp
Salt: to taste
Pepper: as required

How to make:
Steam the washed corn for about 15 min.
In a bowl mix butter, lemon juice and the seasoning.Toss in the steamed corn and mix well till the corn gets coated with the seasoning mixture. Add salt and pepper to taste.
Butter corn is ready...You can vary the seasoning to your taste. Spice it up by adding a pinch of cayenne pepper...


Mar 17, 2012

what makes you happy?


watching elmo dance around makes my li'l one happy!!
knowing that we are having chicken for dinner, makes my hubby happy!!
getting a chance to stretch my legs and read a book makes me happy!!

what makes you happy?


P.S: 
my hubby's concern: J Lo is dating a teenager!!
my concern: what do I do with the couple of over ripened bananas in the fridge?
my li'l one's concern: how do i get to play the baby channel every time I click on the TV remote( even though I am just 18 months old)
what is yours?


Mar 14, 2012

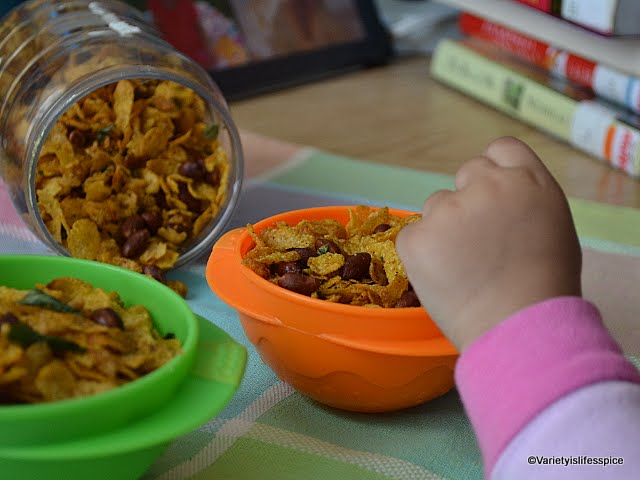
Cornflake mixture---an easy munch on Indian snack


I love crunchy munchy snacks...especially this mixture....its a must buy for every time I hit the Indian grocery store....back home in Kerala, we get this corn flake mixture in 'Honest' bakery...fresh and yummy...i can easily gobble down a packet in a few mins :)
I still remember those days when my dad used to buy these mixture and roasted peanuts very religiously from 'Honest' (well, he buys it now a days too...), I eat it right from the packet and there goes my sweet mother cribbing about the pimples that used to pop up on my face the very next day....thanks to my oily skin....

see this, even my li'l one loves to pick the corn flakes from it...mommy's girl :)


very easy to put together....

You'll need:


Corn flakes: 3 cups
Roasted nuts: 1 cup (mostly shelled peanuts and cashew nuts)
Golden raisins: 1/4 cup
Chili powder: 1 tsp
Turmeric powder" 1/3 tsp
Salt: to taste
Sugar: 1/2 tsp
Lime juice: 1 tsp
Curry leaves: a few sprigs

Note: You can vary it by adding any kind of nuts or dry fruits of your choice...like almonds, pistachios, dried   cranberreis, dried apricot etc...

How to make:


Heat oil in a pan and toss in the raisin and nuts.Add the curry leaves and stir for a min or two.
Reduce the heat to low, and add the chili powder, turmeric powder, salt and sugar.
Carefully mix in the tsp of lime juice, for it will make the oil splatter.
Now slowly fold in the cornflakes in batches and let it stand on low flame for about 3-4 min, until the cornflakes gets coated well with the spice mixture.
Let it cool and store in an airtight container....and start munching :)


Feb 24, 2012

Banana nut muffin...with a crunchy topping


what do you do with those over ripened bananas? I'm always out of options when i think of getting rid of the over ripened bananas...i like my banana just ripe....no more ..no less...even my li'l one enjoys hers the same way...usually we buy only a few at time, so that we don't have to worry about the over ripened ones...
was looking for ideas to use them, and happened to see this muffin recipe...which actually called for these over ripened bananas...bingo...there you go :)


and the crunchy topping.....an added bliss to the muffins...i have had these crunchy toppings in the store bought ones n have always wondered what they are...and here it is...a crowd pleaser...


You'll need:
For the muffin:
All purpose flour: 1 1/2 cups
Baking Soda: 1 1/2 tsps
Salt: 1/4 tsp
Nutmeg powder: 1/8 tsp
Over ripened bananas: 4 nos
Chopped and roasted walnut or pecan: 1 cup
White sugar: 1/2 cup
Egg: 1 large
Vanilla extract: 1/2 tsp
Butter: 1/2 cup (1 stick, softened)
Milk: 1/4 cup

For the topping:
All purpose flour: 2 tbsp
Cinnamon powder: 1/8 tsp
Butter: 1 tbsp
Brown sugar: 1/3 cup


How to make:


Preheat oven to 375 degrees.
Line a standard 12 cup muffin tin with paper muffin cups or grease with butter.
In a medium bowl, sift together flour, baking soda, salt and nutmeg powder.
In a small bowl, mash two bananas with a fork, so that they still have a texture.Set it aside.
In another bowl, mash the remaining two bananas along with the sugar using an electric mixer.
Add butter, milk, egg and vanilla extract and beat it together until its completely incorporated, scraping down the sides using a spatula as and when needed.
Add the dry ingredients mixture to this in batches and mix just until its well incorporated.
Fold in the chopped nuts and the reserved mashed bananas to this.
For the topping, in a small bowl, mix the flour, cinnamon powder and sugar. Cut in the butter to this mixture, until it resembles coarse corn meal.
Pour the batter into the prepared muffin cups using an ice cream scoop. Sprinkle the top of muffins with the prepared topping.
Bake in the middle rack of the oven for about 18-20 min ,until the muffins turn golden brown or when the tester inserted into the center of the muffin comes out clean.
Let the muffin tray cool on the wire rack for a few minutes, before you indulge yourself in those delicious yummy muffins...
Serve it hot...the best way to enjoy them, enjoy a few crunchy crumbs on the top first....and then dive into the muffin...yummm


Jan 11, 2012

Fluffy Flaky breakfast biscuits...

Warm fresh biscuits for breakfast, I love them..I guess I started liking it after having the breakfast sandwiches we get on warm biscuits in Dunkin Donuts...yummm
Okay, to be candid, I was not sure i could bake biscuits at home...its like the sugar glazed donuts from Dunkin Donuts...I don't think I will be ever able to make such soft and spongy ones at home...wait a min...you  never know.....i might some day...oh!! how optimistic (not at all like me :)
Okay, go ahead and give this a try....I am sure you will be happy with the results...We started our new year with these fluffy home made biscuits for breakfast...

You'll need:


All purpose flour: 2 1/2 cups
Baking powder: 2 tsp
Baking Soda: 1/4 tsp
Salt: 1 1/2 tsp
Sugar: 1 tbsp
Butter: 1/2 cup (chilled)
Buttermilk: 1 cup (chilled)

How to make:


Preheat oven to 425 degrees.
In a large bowl, sift together all the dry ingredients, ie; all purpose flour, baking powder, baking soda, salt and the sugar.
Cut in the cold butter with a fork into the dry ingredients and mix it together...(there will be small chunks of butter, which is totally okay)
Pour the buttermilk and mix using a wooden spoon until the dough starts to come together.
Now knead using your hands for a couple of times. The dough should be sticky.
Turn the dough on to a  floured surface and knead it just until it dough comes together.
Roll the dough using a rolling pin  to 1/2 inch thickness. Cut out rounds using a biscuit cutter and place them on the baking sheet. (At this point you can brush the top of each with some melted butter...it gives the golden crust on top)
Bake in the preheated oven for about 12 min, or until it gets the golden crust on top.

Serve hot out of the oven....a perfect breakfast as such... good for sandwiches too...
sausage egg n cheese on a buiscuit, anybody....I am in :)
You'll have a good one :)

Jan 1, 2012

Date-Nut Bread... Welcome 2012!!

A very prosperous new year, 2012 to all of you :)
Winter has set in...that marks the beginning of baking time in our place...may be because I have more time in hand this time of the year, bcoz its cold outside and we tend to stay indoors with our li'l one :)
I don't know, may be another excuse to bake..I love to bake....not that all my attempts has always been a success...but still I love to bake...
hope you'll had wonderful new year's day celebrations....ours was a low key affair this time....watching ball drop slouched on the sofa, wishing everyone a happy new year, afternoon mass and a lunch buffet....

This date nut bread is something I baked for the first time...I had bookmarked it here
http://kateinthekitchen.com/2008/12/22/national-date-nut-bread-day/


A good bread to munch on as an evening snack...
Here is the recipe

You'll need:
All-purpose flour: 1 1/2 cups
chopped dates: 2 1/2 cups
Butter: 1/4 cup
Boiling water: 1 1/2 cups
Brown sugar: 1/2 cup
Egg: 1 no
Baking powder: 1 tsp
Baking soda: 1 tsp
Salt: 1/2 tsp
Chopped almonds: 1 cup


How to make it:
Preheat oven to 350 degree F. Grease a 9 by 5 inch loaf pan.
Combine the flour, baking powder, baking soda and salt and set aside.
In a bowl, mix butter and dates. Pour boiling water into this and break up the clumps, if any. Let this cool down for a while.
Mix in the sugar and egg until well blended.
Add the flour mixture into the date mixture, and mix well.
Pour the batter into the greased pan and bake for 50 min or until a wooden pick inserted comes out clean :)

Related Posts Plugin for WordPress, Blogger...

Total Pageviews

Powered by Blogger.